The page helps you to add vendors, bills, expenses, invoice purchases, batch payments, retainage invoices, accounts payable, vendor credit, etc.
Managing expenses is crucial for healthy finances. In the Accounts Payable section, you can categorize and track transactions like expenses, bills, purchase orders, and payments.
Instructions
To manage expenses:
- Go to Account Payable.
- In Expenses, you can create different categories:

Add an Expense
Adding expenses to your accounting platform ensures that all financial transactions are accurately recorded and linked to the appropriate projects or accounts.
Instructions
To add an expanse:
- Go to Account Payable.
- Select New Expanse. Then, click on Expense.

- Vendor: Select the vendor from whom you are purchasing goods or services. This ensures that the expense is properly attributed to the correct supplier.
- Job (optional): Choose the job associated with the expense. This links the expense to a specific project, helping in accurate cost tracking and job costing.
- Transaction Date: Enter the date the transaction took place. This is crucial for maintaining accurate financial records and ensuring the transaction is recorded in the correct accounting period.
- Posting Period: Specify the accounting period in which this transaction will be recorded. This helps in accurate financial reporting and ensures that expenses are attributed to the correct fiscal period.
- No.: Input the reference number for the transaction, which can be an invoice number or another identifier. This helps track and audit the transaction.
- From Account:
- Cash: Use this option if the payment is made directly from the cash reserves.
- Operating Bank Account: Select this if the payment is processed through the company’s main bank account used for day-to-day operations.
- Payroll Bank Account: Choose this account if the payment is related to payroll expenses.
- Account: The general ledger account where the expense will be recorded.
- Description: A brief description of the item or service.
- Cost Code: Select the appropriate cost code to categorize the expense within the project or job.
- Amount (in dollars): Enter the monetary value of the item or service.
- Billable: Indicate whether this expense can be billed to the client, ensuring accurate billing and revenue recognition.
- Delete (in Actions): Option to remove an item from the list if it was added by mistake or is no longer needed.
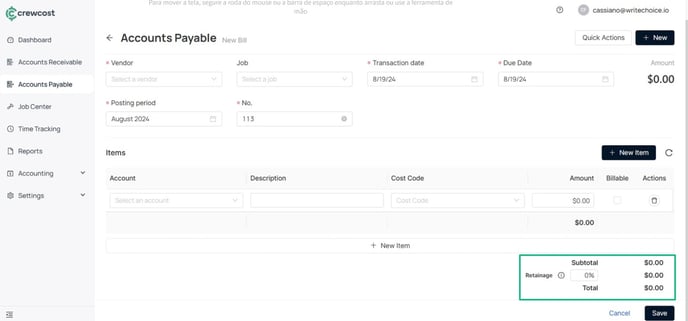
Add a Bill
Adding a Bill is similar to adding an expense. However, when adding a bill, you also have the option to include Retainage, which is the percentage of the payment withheld until the project is fully or substantially completed.
Instructions
To add a bill:
- Go to Account Payable.
- Select New Expense. Then, click on Bill.
- Fill the necessary information:
-
- Vendor
- Job (optional)
- Transaction Date
- Posting Period
- No.
-
- Account
- Description
- Cost Code
- Amount (in dollars)
- Billable
- Delete (in Actions): Option to remove an item from the list if it was added by mistake or is no longer needed.
6. Select Save.
Add a Purchase Order
When adding a purchase order, you create a formal document that outlines the goods or services you are purchasing from a vendor. It helps track expenses related to a job or project before the payment is made.
Instructions
To add a new purchase order:
- Go to Account Payable.
- Select New Expanse. Then, click on Purchase Order.
- Fill in the following details:
- Vendor: Select the supplier from whom you're ordering goods or services. This links the purchase order to the correct vendor.
- Job (optional): Choose the specific project or job associated with the purchase order. This helps in accurate tracking of project-related expenses.
- No.: Enter a unique reference number for the purchase order. This number helps track and manage the order.
- Shipping Address: Specify the address where the goods or services should be delivered.
- Transaction Date: Record the date when the purchase order was created. This is important for maintaining accurate records.
- Status: Set the current status of the purchase order:
- Draft
- Accepted
- Closed
-
- Product: Select the specific product or service you are ordering.
- Description: Provide a brief description of the product or service for clarity.
- Account: Choose the general ledger account where the purchase will be recorded.
- Quantity: Enter the number of units you are ordering.
- Unit Cost: Specify the cost per unit of the product or service.
- Total Cost: This field will automatically calculate the total cost based on the quantity and unit cost.
- Delivery Date: Set the expected delivery date for the goods or services.
5. Select Save to confirm.
Add a Purchase Invoice
Creating a purchase invoice allows you to record and track the financial obligation to a vendor for services or products received. It ensures all expenses are accounted for before making payments.
Instructions
To add a new purchase invoice:
- Go to Account Payable.
- Select New Expanse. Then, click on Purchase Invoice.
- In Purchase Order, select the Transaction Date of your preference. Then, select Next.

4. In the Invoice Items section, choose the products you want to include.
Info: You can also select a different account or adjust the quantity received as needed.
5. Select Next.
6. Confirm the details. Then, select Save to complete the process.
Add a Retainage Invoice
A retainage invoice is used when part of the payment is withheld until the completion of a project. Adding this type of invoice ensures that the amount retained from the vendor is properly tracked and managed.
Instructions
To add a new purchase invoice:
- Go to Account Payable.
- Select New Expanse. Then, click on Purchase Invoice.
- In the Vendor section, select your preferred Vendor and click Next.
- In the Retainage Invoices section, choose one or more Invoice No.
- In the Essentials section, you need to fill out the following details:
- Terms: Specifies the payment terms for the transaction, such as Immediate (due upon receipt), Net 15 (due in 15 days), Net 30 (due in 30 days), or Net 60 (due in 60 days). This determines when payment is expected.
- Transaction Date: The date when the transaction occurred. This helps in tracking and recording the transaction accurately within the correct time frame.
- Posting Period: Indicates the specific accounting period in which the transaction will be recorded. This is crucial for accurate financial reporting.
- Number: A unique identifier for the transaction, such as an invoice number. This helps in tracking and referencing the transaction.
Info: You can also add notes if needed before finalizing the purchase order. Notes can include any additional details or instructions relevant to the transaction.
Add a Payment
When adding a payment, you can select the vendor, payment method, and details related to the transaction, ensuring all payments are accurately recorded.
Instructions
To add a new payment:
- Go to Account Payable.
- Select New Expanse. Then, click on Payment.
- Select a vendor. Then, select Next.
- In Purchase Invoices & Bills, check all the options of your preference.
They include due date, number, vendor, balance and payment amount. - In Vendor Credit, you can optionally create a new vendor if needed, filling the information:
-
- Vendor: The supplier or service provider from whom you have received a credit. This credit could be due to overpayment, returned goods, or any other reason that results in a credit balance with the vendor.
- Payment Balance: The outstanding balance owed to the vendor after the credit is applied. This balance remains to be paid after deducting any available credits.
- Available Credit: The total amount of credit that you currently have available from the vendor. This credit can be used to offset future payments or invoices.
- Applied Credit: The portion of the available credit that you choose to apply to a specific transaction or payment. Applying this credit reduces the amount you need to pay for that particular transaction.
- Remaining Credit: The balance of the credit that remains after applying part of it to a payment. This credit can be used for future transactions.
- Payment Amount: The total amount to be paid after applying the vendor credit. This is the final amount you owe after all credits have been deducted.
-
- Transaction Date: The date on which the transaction occurs. This is important for maintaining accurate records and ensuring that the transaction is logged in the correct accounting period.
- Posting Period: The specific accounting period (e.g., a month or quarter) during which the transaction is recorded. This helps in financial reporting and ensures that all transactions are categorized in the correct time frame.
- Number: A unique reference number for the transaction. This could be an invoice number, check number, or any other identifier that helps in tracking and auditing the transaction.
- Payment Method:
- Direct Deposit: An electronic payment method where funds are transferred directly to the vendor's bank account.
- Paper Check: A traditional payment method where a physical check is issued to the vendor.
- Record Only: Used when the transaction is recorded for tracking purposes but does not involve an actual payment at that time.
- From Account:
- Cash: Indicates that the payment is being made from the company’s cash reserves.
- Operating Bank Account: The main bank account used for daily business transactions.
- Payroll Bank Account: A bank account specifically used for payroll-related expenses.
- Additional Details (Notes): Any extra information or special instructions related to the transaction. If you're using the paper check method, this note will also appear as the memo on the check (up to 25 characters).

Add Batch Payments
Batch payments simplify the payment process by paying multiple invoices at once.
Instructions
To add a batch payment:
- Go to Account Payable.
- Select New Expanse. Then, click on Batch Payments.
- In the Type section, choose how you'd like to view what you owe, either by due date or by job. Then click Next.
- In the Purchase Invoices & Bills section, check the options that apply to you, and then click Next.
- In the Vendor Credit section, you have the option to create a new vendor or select an existing one.

- Transaction Date: The specific date when the transaction is recorded or took place. This is crucial for maintaining accurate financial records.
- Posting Period: The accounting period (e.g., month or quarter) in which the transaction will be posted. This helps ensure that financial statements reflect transactions in the correct timeframe.
- Payment Method:
- Direct Deposit: An electronic transfer of funds directly to the recipient's bank account.
- Paper Check: A traditional method where a physical check is issued for payment.
- Record Only: Used for recording the transaction without an immediate payment, often for tracking purposes.
- From Account:
- Cash: Indicates payment is made from the company’s cash reserves.
- Operating Bank Account: The main bank account used for day-to-day business operations.
- Payroll Bank Account: An account dedicated to payroll expenses.
- Reference Number: A unique identifier for the transaction, such as an invoice or check number, which helps in tracking and auditing.
- Notes: Additional details or comments about the transaction. If a paper check is selected, this note will appear as the memo (up to 25 characters).
Add Vendor Credit
Vendor credit is recorded when the vendor has issued a credit due to overpayment or returned goods. It helps in keeping track of available credits that can be applied to future payments.
Instructions
To add a new vendor credit:
- Go to Account Payable.
- Select New Expanse. Then, click on Vendor Credit.
- In Essentials, fill in the main information:
- Vendor: Select the vendor associated with the credit. This ensures that the credit is linked to the correct supplier.
- Job (optional): Choose the specific project or job if the credit is related to a particular job. This helps in accurate job costing.
- Transaction Date: Enter the date the vendor credit is issued. This is important for accurate financial record-keeping.
- Number: Input a reference number for the transaction. This could be an invoice number or another identifier for easy tracking.

- In Items:
- Select New Item: If you need to add multiple items, then click New Item to include additional entries.
- Fill in the following information:
- Account: The general ledger account where the credit will be recorded.
- Description: A brief description of the item or service related to the credit.
- Cost Code: Select the appropriate cost code for categorizing the credit within the project or job.
Info:
Go to Create a Cost Code page to learn how to manage and create cost codes.
-
-
- Total Price (in dollars): Enter the total amount of the credit.
5. Click Save to complete the process. -
What's next?
Keep exploring our platform by taking the next step: Print a check after a bill is entered page.